
Build a seamless tileset
A tile is seamless when its edges line up with its own repeats, so it forms a continuous surface with no grid lines and no visible border where one tile meets the next. The difference is in the edges, and Tiled Preview catches edge errors before export.
The result is grass, dirt, and water tiles that repeat seamlessly, stored in a Tile Atlas for reuse.
New project at tile size
Section titled “New project at tile size”Make a new project at your tile size; 16×16 or 32×32 suit most games. Name it tileset_grass. One project per tile family keeps the work organised, because a tile project and a character project have nothing in common.
Turn on Tiled Preview first
Section titled “Turn on Tiled Preview first”Before drawing anything, select any drawing tool (Pencil is fine) and tick Tiled Preview in Tool Options on the right. The canvas now repeats in every direction. This is the single most important step. Drawing the tile while you can see the repeats is what makes a seamless result possible, and drawing first then checking the repeats afterward lets seams slip through.
Draw the grass tile
Section titled “Draw the grass tile”Pick three or four greens as a small ramp. Fill the whole tile with the mid green using the Fill tool, then scatter darker and lighter pixels for texture. Because Tiled Preview is on, you’ll see immediately whether the left edge connects to the right edge and the top to the bottom. If there’s a visible line where tiles meet, those edge pixels aren’t matching up.
Fix the seams
Section titled “Fix the seams”For a noise-style tile, the principle is that edge pixels must continue the noise pattern across the boundary rather than cut it off. The right edge of the tile has to flow into the left edge of the next repeat; the bottom into the top. Edit edge pixels until the repeat is invisible.
Tiled Preview shows the seam closing in real time as edge pixels are adjusted. Stop when grid lines are gone.
Push the tile into the Tile Atlas
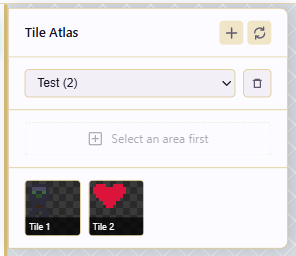
Section titled “Push the tile into the Tile Atlas”Once the grass tile is seamless, select the whole tile with Rectangle Selection (M) or Ctrl+A. Open Tile Atlas from the bottom of the left tool rail. Create a New Atlas named terrain, then Add tile to push the selection into it. Name the tile grass.
Repeat for dirt and water
Section titled “Repeat for dirt and water”Repeat the draw-and-seam-check-and-store process for dirt and water, each as a tile in the same terrain atlas. Each one needs its own edge pass, so don’t assume a technique that worked for grass transfers exactly.
Compose a sample map to verify
Section titled “Compose a sample map to verify”To prove the tiles work together, open a fresh larger canvas (128×128), select the Tile Stamp tool (T), pick the grass tile from the atlas, and click to stamp. Stamp a 4×4 grid, switch to dirt and water, and lay down transitions. If the seams are invisible at this scale, the tiles are ready.
Export
Section titled “Export”Open Export and pick PNG at scale 1× for source tiles. For a full tileset image, lay the tiles out on a larger canvas before exporting, or export the individual tiles and let your engine’s importer assemble the atlas.
Where grass meets dirt you’ll usually want a few transition tiles (a grass tile with a dirt corner, and so on). Draw those on the same terrain atlas so the tile family is stored together.