
Designer and testing
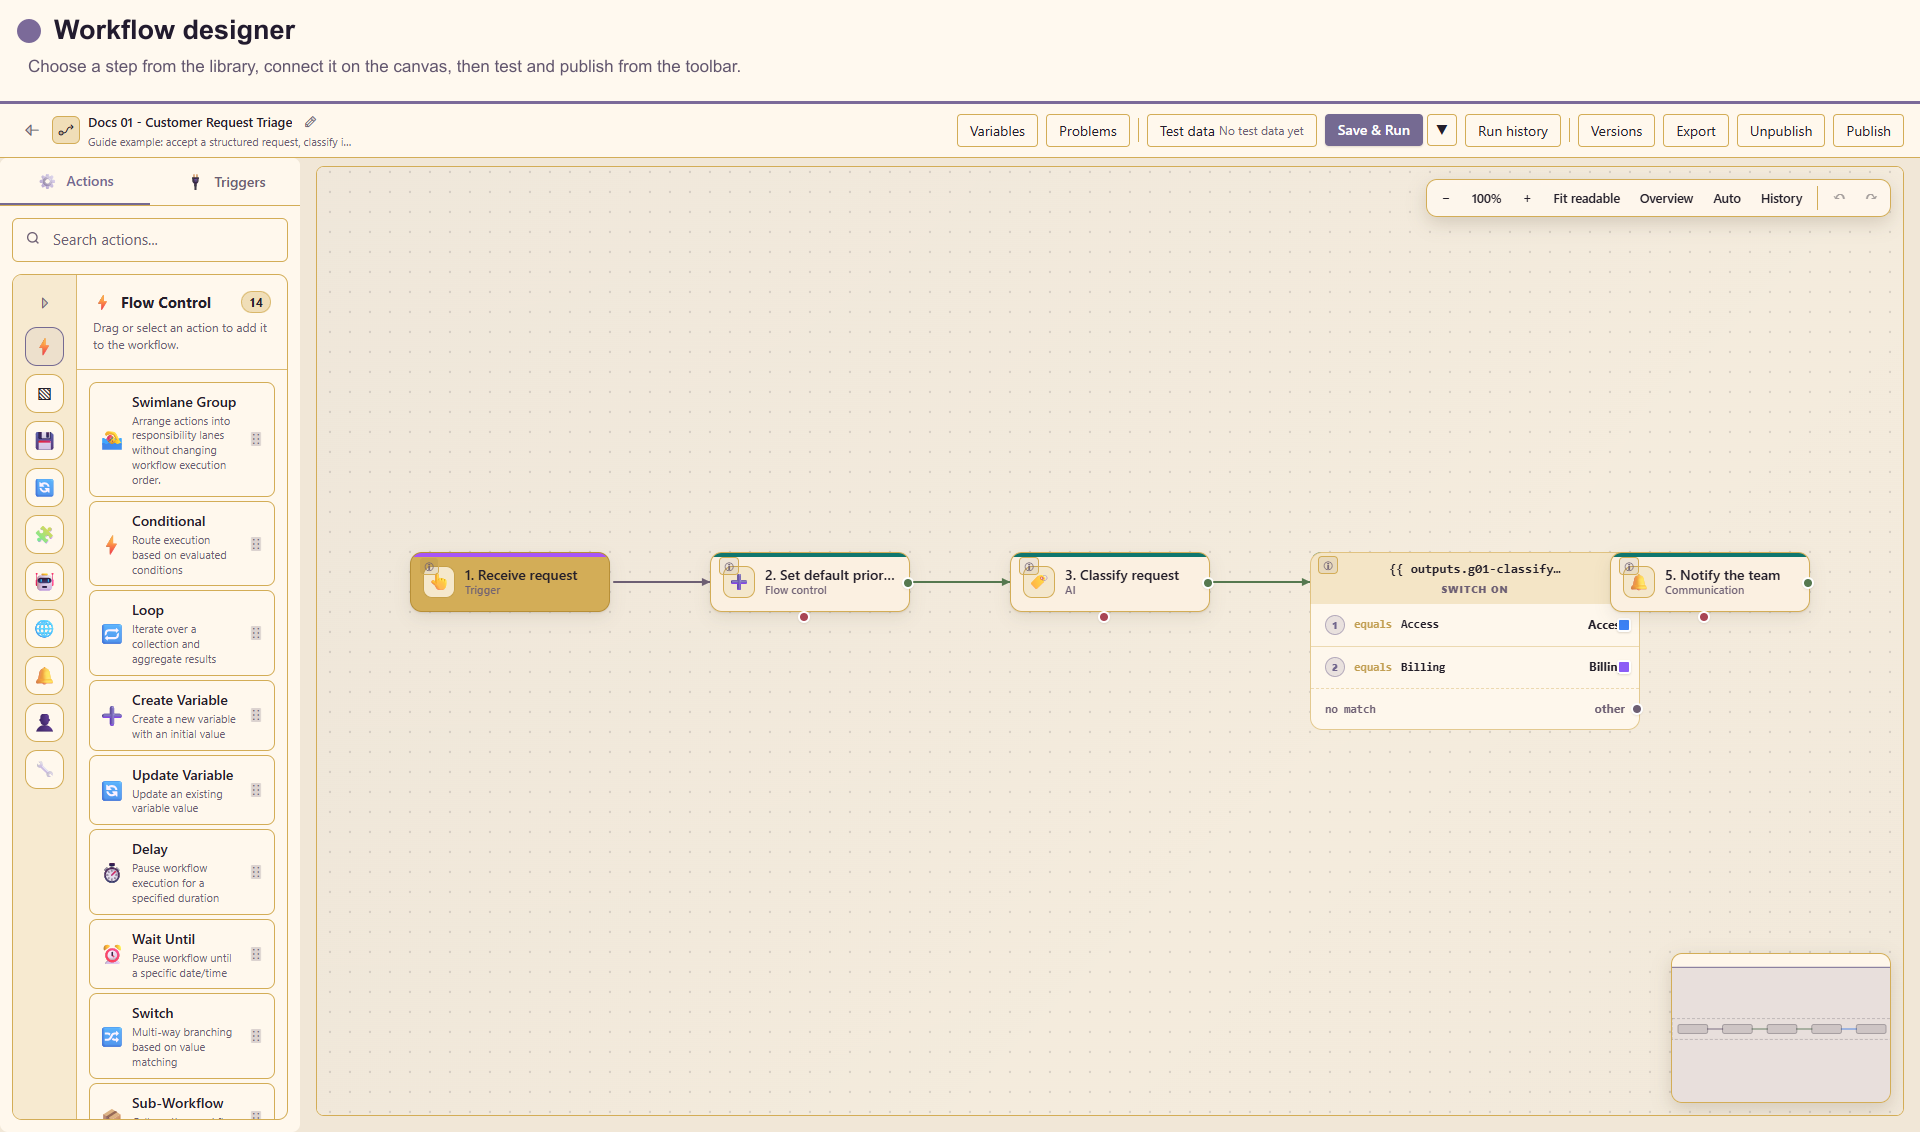
The workflow designer is a free-form canvas for assembling one trigger and its connected actions. It opens at 100% and centres the workflow content while keeping the trigger visible, so the first customer-visible path is immediately understandable.
Read the screen
Section titled “Read the screen”- The Actions / Triggers library is on the left. Search by name or choose a category.
- The canvas is the source of truth for execution order. Lines, ports, and branch labels define where work goes next.
- The canvas controls provide zoom out, 100% reset, zoom in, Fit readable, Overview, Auto, history, undo, and redo.
- The workflow toolbar provides Variables, Problems, Test data, Save & Run, Run history, Versions, Export, Unpublish, and Publish.
- Selecting a node opens its compact inspector. Choose Open full config for configuration, retry, and label tabs.
Build on the canvas
Section titled “Build on the canvas”Select an action to place it or drag it to a specific position. Connect the source port on the right of one node to the target port on the left of the next node. Most actions expose a green success port and a red error port; branching actions expose named ports.
Use short, outcome-oriented labels such as “Validate order” or “Notify account owner”. Add a note that explains a business rule or an environment choice. Labels must be unique because expressions and run history use them to help people identify steps.
Layout tools do not execute
Section titled “Layout tools do not execute”Swimlane Group, Layout Group, Note, and Reroute organise the canvas. They do not change workflow execution unless you also change the runtime connections. Use swimlanes to show ownership, notes to explain a rule, and reroutes to keep long connections legible.
Zoom and centre the workflow
Section titled “Zoom and centre the workflow”- 100% returns the canvas to actual size without changing node positions.
- Fit readable fits as much content as possible while preserving readable cards.
- Overview fits the whole graph, including distant branches.
- Auto rearranges the graph; review branch order and annotations afterwards.
- The minimap shows the visible viewport relative to the whole workflow.
When a workflow opens, Lunar Paper centres its content at 100% and includes the trigger in the initial viewport. Use Overview for a large graph, then return to 100% when configuring individual nodes.
Configure a step
Section titled “Configure a step”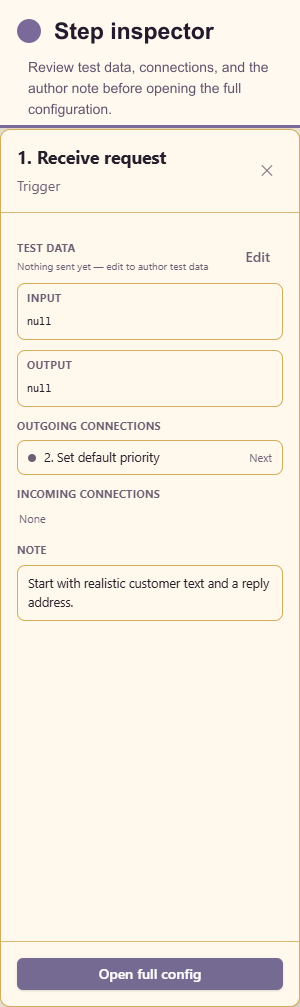
The inspector summarises test input and output, connections, the author note, and warnings or errors attached to the node.
Open the full configuration drawer to edit the action or trigger. Every action drawer also has:
- Configuration for action-specific fields;
- Retries for bounded automatic retry behaviour;
- Label for a unique canvas label, note, and colour;
- Test for a dry run;
- Run for real for an intentional side-effecting test.
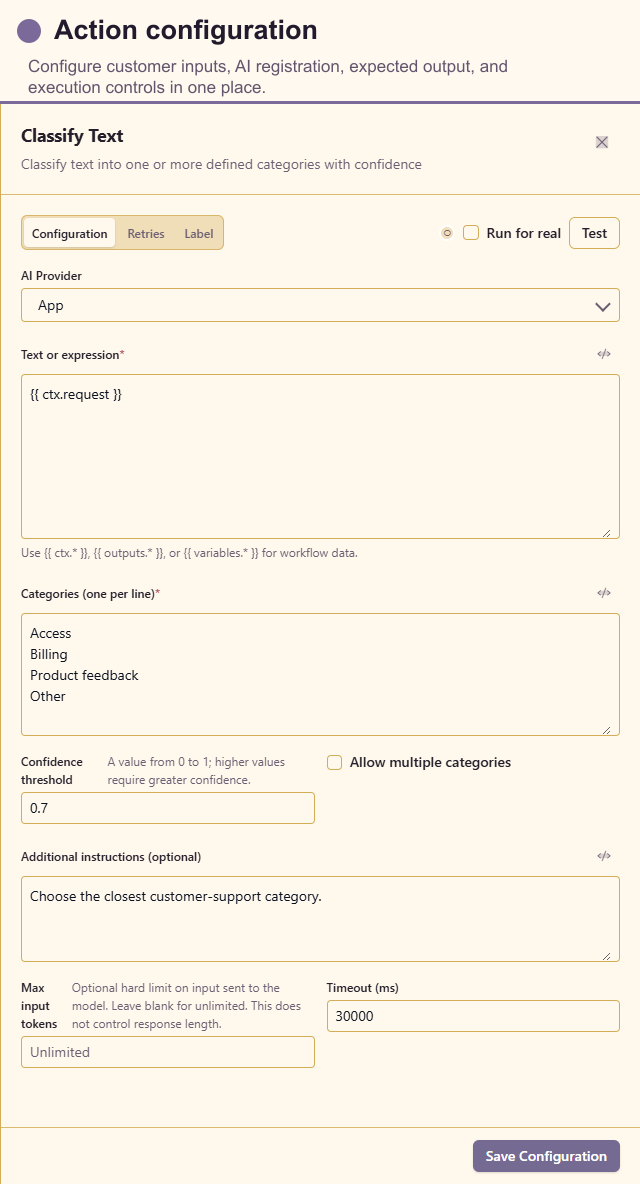
Dry run is the safe default. A live test may send email, create tasks, change records, call an API, or produce other customer-visible effects. The designer asks for confirmation and may require trigger test data first.
Use workflow data
Section titled “Use workflow data”Open the expression picker from an expression-enabled field. It exposes three data scopes:
ctx— data supplied by the trigger;variables— named values created or updated by Flow Control actions;outputs— results from connected upstream actions.
Examples:
{{ ctx.customer_email }}{{ variables.priority }}{{ outputs["Classify request"].category }}Prefer selecting an output in the picker. If a label changes, re-open downstream expressions and verify the reference. Never place passwords, API tokens, or HMAC secrets in expressions or ordinary configuration fields; use a managed credential.
Author trigger test data
Section titled “Author trigger test data”Choose Test data to create a reusable profile. For a Manual trigger, declare input fields and use their defaults as a realistic sample. For event triggers, paste a representative payload with the same shape the platform emits.
Good test data is synthetic, representative, free of real customer personal information and secrets, and paired with empty or invalid variants for error-path testing.
The designer learns action output shapes from successful tests. Those learned outputs improve the expression picker for downstream steps.
Variables and outputs
Section titled “Variables and outputs”Choose Variables to inspect values declared by Create Variable and used by Update Variable. Use variables for workflow state that intentionally changes. Use action outputs for immutable step results.
Avoid creating a variable simply to rename an output. Use a clear node label or Transform Data when the goal is to normalise a structure.
Problems
Section titled “Problems”Problems collects missing required fields, invalid expressions, unconnected paths, unavailable resources, and other publish blockers. The count also appears on affected nodes.
Resolve problems from the trigger forward. Later errors often disappear once an upstream resource or output is valid. A draft may remain open with problems, but Save & Run or Publish can be disabled until required configuration is complete.
Retry policy
Section titled “Retry policy”Use the Retries tab only for transient failures such as a timeout or short service interruption. Configure a small maximum attempt count and increasing delay. Do not retry validation failures, rejected approvals, missing required customer data, or permanent 4xx API responses.
Pair retries with an error connection or Try-Catch so the workflow eventually reports a failure. Avoid combining an unbounded loop with retries.
Save and run
Section titled “Save and run”Draft edits autosave. The status indicator moves through saving, saved, or retry-required states. If saving fails, keep the designer open and use the retry control after connectivity returns.
Save & Run ensures the latest draft is stored, then starts a test execution. Before running:
- confirm the active test profile;
- review side-effecting actions;
- ensure all required resources and recipients are selected;
- resolve Problems that block execution.
Read run history
Section titled “Read run history”Open Run history, select a run, and inspect every step. Check status, start and finish time, resolved input, output, retry attempts, and errors. A successful final status is not enough: verify that the customer-facing values and destinations are correct.
For a branch, confirm the expected path ran and the other paths did not. For Parallel, confirm every intended branch reached Parallel Join. For Human Tasks and Wait Until, a waiting state is expected until the person responds or the time arrives.
Versions, export, and publishing
Section titled “Versions, export, and publishing”Versions records saved workflow definitions. Export downloads a portable workflow definition; review environment-specific IDs and credentials after import.
Publish activates the workflow for live triggers. Unpublish stops new trigger-driven runs but does not erase run history or cancel work that has already started. Before publishing, have another service owner check trigger scope, recipients, credentials, external destinations, data-writing actions, retries, error paths, and the privacy of logs and generated content.