
Edit recorded performances
A recorded instrument take keeps its editable musical actions. You can reopen a clip to move a late note, soften a drum hit, adjust a chord, or change a recorded control movement without performing the entire part again.
Instrument and Performance are two views of the same take. Their buttons sit in the modal header, with Instrument first and selected when you open it.
Record and review before saving
Section titled “Record and review before saving”- Open an instrument from the timeline and choose its sound and settings.
- Start recording using the instrument’s recording control, play your part, then stop.
- Click Performance in the modal header to inspect the captured actions. You can do this before adding anything to the timeline.
- Make an adjustment and click Preview take to hear it. Loop preview repeats the take; Stop ends the preview.
- Return to Instrument if you want to use its playable surface or settings again.
- When ready, use the instrument’s Add to Timeline control or Save as new clip in Performance.
Switching between the two views preserves the uncommitted recording, settings, and edits. If you switch to Performance while recording, recording stops and the captured take becomes available there. Instrument keyboard shortcuts are inactive while you work in Performance.
The draft lasts while the modal remains open. Switching views does not save it to the project. Cancel or closing the modal discards unsaved changes; save the take before closing or refreshing the page.
Reopen and edit an existing clip
Section titled “Reopen and edit an existing clip”Double-click an instrument clip on the timeline, then choose Performance in the header. Its saved actions appear in the editor.
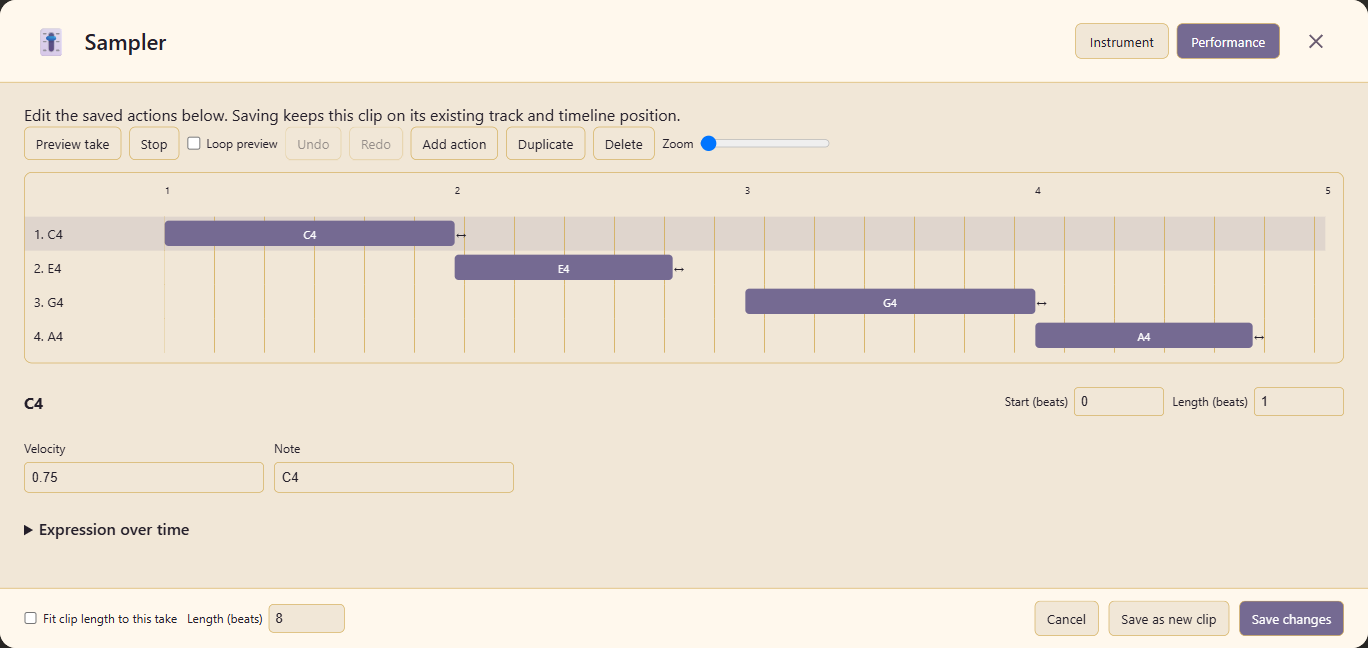
Select an action by clicking its name or its block. The fields below the timeline change to match that action.
| Control | Use it to |
|---|---|
| Start (beats) | Set when the action starts within this take. 0 is the beginning of the clip. |
| Length (beats) beside the selected action | Set that action’s duration. |
| Drag a block | Move the action earlier or later. |
| Drag its right-edge handle | Change the action’s duration. |
| Add action | Add a note, hit, trigger, chord, or layer where the instrument supports it. |
| Duplicate / Delete | Copy or remove the selected action. |
| Zoom | Change the timeline view without changing the take. |
| Undo / Redo | Step through edits made in Performance, including after switching views. |
For example, if a Sampler note lands a quarter-beat late, select it and reduce Start (beats) by 0.25. Adjust Velocity if the attack is too strong, preview the take, then choose Save changes.
Pitch, velocity, articulation, sound parameters, and other fields depend on the instrument and the information saved with the take. Controls for a single generated sound or a microphone recording differ from the note timeline.
What you can edit
Section titled “What you can edit”The common Performance view covers all 23 instrument editors. Browse Sounds is the separate library/import tool in the instrument picker.
| Instrument or family | Editable performance |
|---|---|
| Harp, Triangle, Glockenspiel, Kalimba, Cello, Hand Percussion | Individual notes or hits, their timing, and captured expression or technique fields. |
| Guiro | Scrape strokes and taps. Moving or resizing a stroke keeps its ridge events together. |
| Woodwind, Saxophone, Clarinet | Notes, held lengths, and saved expression curves where present. |
| Sampler, Piano Roll | Notes, pitch, timing, duration, and velocity. Sampler also provides source-sample controls. |
| Audio Launchpad, Sound Playground | Pad or zone triggers, timing, and saved per-event controls. Launchpad includes held lengths where recorded. |
| Drum Kit, Beat Patterns | Drum hits or pattern steps, timing, and velocity. |
| Mood Chords | Chord blocks and their timing. Recording manual chord triggers captures the order and timing you played. |
| Soundscape Builder, Scene Composer | Layer regions, settings, and recorded control movements. |
| SFX Launcher | Sound settings and grouped trigger timing. Saving an edited group updates its existing clips. |
| SFX Generator | The generated sound’s parameters and saved variation settings. |
| Vocal Booth | The source waveform, trim, fades, gain, effect, and intensity. |
| Vocal Synth | Notes and saved syllable or phoneme information, with voice controls in Instrument. |
The instrument guides in the catalogue explain how to play each surface. Playable surfaces scale to fit the modal, keeping the recording controls visible; their right-hand control panels scroll independently. Performance has a scrolling edit area with save controls fixed below it.
Shape expression over time
Section titled “Shape expression over time”Select an action to edit any saved expression curves it carries, such as a woodwind breath curve. You can adjust existing points, add points, or delete them. The controls shown depend on what was captured.
Open Expression over time to add Level, Pan, or Filter cutoff (Hz) points. These points use beats relative to the clip, and values change smoothly between them. For Soundscape Builder and Scene Composer, the selected layer also has its own expression controls.
To capture movements in those two layer instruments, click Record controls, change layer levels or the available position controls, then click Stop recording. Open Performance to adjust the recorded points. You can also keep a static layer mix without recording control movements.
These controls shape an individual clip or layer. The project’s Dynamics lane and Tempo lane are separate arrangement controls.
Record more into an existing take
Section titled “Record more into an existing take”For instruments that record notes, hits, or other event sequences, use the recording mode in the Instrument view before starting a new recording:
| Mode | Result |
|---|---|
| Replace this take | Use the new recorded sequence in place of the previous one. |
| Append after this take | Keep the previous actions and place the new sequence after their end. |
| Overdub from the start | Keep the previous actions and layer the new sequence from the beginning of the take. |
Append and overdub apply to event recordings. They do not layer a second microphone recording over a Vocal Booth waveform or combine two single generated effects. Preview the combined take in Performance before saving.
Save the change or keep a copy
Section titled “Save the change or keep a copy”Save changes updates the clip you opened. Its track, timeline position, name, and mix settings stay in place. Grouped SFX keep their existing placement unless you explicitly edit a member’s timing.
Save as new clip keeps the original and creates another clip at the current playhead position. Use it when you want an alternate performance to compare.
In Performance, an existing clip keeps its timeline length by default, including an extended or looping clip. To change that length, select Fit clip length to this take. The footer’s Length (beats) then becomes editable. This is separate from the selected action’s length above.
If another collaborator changes or removes the source clip while you are editing, saving reports a conflict. Reopen the current clip to review the latest version before applying your changes.
Microphone recordings and custom samples
Section titled “Microphone recordings and custom samples”Saving a Vocal Booth take or a custom Sampler/Launchpad source stores its audio with the service so it can be reopened later. Wait for saving to finish. If an upload fails, the draft remains open so you can retry.
For Vocal Booth, use Trim start (s) and Trim end (s) to choose the source region, Fade in (s) and Fade out (s) for its edges, and Gain for its level. These edits preserve the original source recording. Preview take, timeline playback, and export use the saved performance changes.
If an older recording or sample is unavailable, use Relink source audio to choose the original file. Existing saved actions remain editable, but the editor cannot reconstruct gestures that were never saved or recover a missing audio file without a replacement.
Related
Section titled “Related”Work with tracks covers placement and track controls. Export audio renders the edited arrangement. Troubleshooting covers missing sources and save conflicts.