
Layers, frames & the timeline
In Pixel Art Studio every frame is a stack of layers, and every layer can be animated on its own. The timeline holds both composition and timing, so you edit them in one place.

Layers
Section titled “Layers”Layers separate artwork into the parts you’ll edit independently: outline, fill, shading, background, effects, reference, props, or alternate construction passes. Keeping them apart is what makes animation, variations, and cleanups manageable later.
The module supports normal layers, Layer Groups (a folder that holds child layers, so a 36-frame character with six layers per frame stays organized), and reference or background layers.
Each layer row in the timeline has Hide, Lock, a clickable name, and per-layer Tween and 3D buttons for animation generation. Across the whole stack you can duplicate (Ctrl+J), merge down (Ctrl+E), add a new layer (Ctrl+Alt+N), reorder by dragging, and toggle visibility (Alt+H). Every layer has its own opacity and Blend Mode.
The blend modes are: Normal, Multiply, Screen, Overlay, Darken, Lighten, Color Dodge, Color Burn, Hard Light, Soft Light, Difference, Exclusion. Multiply suits shadows; Screen and Color Dodge suit highlights; Overlay saturates midtones.
Frames
Section titled “Frames”Frames are the individual images that make up an animation, and each frame is a complete layer stack.
Add a frame with Add Frame at the end of the frame strip or Ctrl+Shift+N. Frames can be duplicated, deleted, reordered by dragging, and selected by clicking. Each frame has its own duration: click the millisecond button under the frame (the default is 100) to change it. The status bar shows the current position (for example 1 / 36), the approximate FPS, and the total duration.
Frame timing
Section titled “Frame timing”Frame duration directly affects how a sprite reads. A 60 ms frame is about 16 FPS; a 100 ms frame about 10 FPS; a 200 ms frame about 5 FPS. Idle loops often run around 8 FPS, action animations 12 to 15. For a brisk walk, try 80 ms per frame. The FPS readout in the playback bar confirms the result.
Timeline views
Section titled “Timeline views”Simple Timeline shows a single row of frame thumbnails, suited for editing one animation at a glance. Grid Timeline lays every layer as a row against frame columns, so you can edit composition and timing together. Switch between them from the buttons at the timeline’s top-right.
Use Collapse timeline beside those buttons to reduce it to a slim bottom bar and give the canvas more room. Expand timeline restores your current view and selection. When the Rig editor is open, its panel extends down beside the timeline to the bottom of the editor.
Playback
Section titled “Playback”Three loop modes: Loop plays continuously, Ping-Pong plays forward then backward, and Play Once runs a single full pass. Speed runs from 0.25x to 4x. Solo selected layer (S) isolates one layer during playback. Timeline zoom (50% to 200%) controls thumbnail size, not the canvas.
Animation tags
Section titled “Animation tags”Tags are named frame ranges. They’re how one project exports multiple animations: you slice a single timeline into idle, walk, attack, hover, selected, disabled, or whatever names your engine expects. A tag carries a name, a start and end frame, a total duration, a direction (Forward, Reverse, Ping-Pong), and a color for visual grouping.
Tags also drive export: the Export dialog lets you target all frames or a single tag, so one project can ship every animation a character needs. The full workflow, including tag-driven export, is in Slice animations with tags.
Layer groups and blend modes
Section titled “Layer groups and blend modes”The Tween button on each layer row opens the tween generator, which builds in-between frames between two keyframes. Crossfade blends pixel content; Motion tries to move detected shapes; Hybrid uses motion where it can and falls back to blending. Easing options are Linear, Ease In, Ease Out, and Ease In Out. See Generate in-between frames for guidance on when tweening helps and when it appears muddy.
The 3D button opens the pseudo-3D generator, which builds a rotation-style sequence from a single layer. Options cover the rotation axis (Y turntable, X flip, Z flat spin), isometric directions, frame count, rotation range, direction, and frame duration. Output is a starting point; plan to clean up silhouettes and lighting by hand. The end-to-end workflow, including cleanup, is in Spin an item with pseudo-3D.
Onion skinning
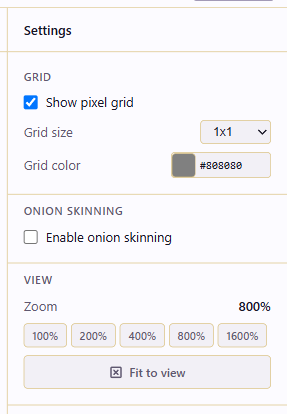
Section titled “Onion skinning”Onion skinning shows faded ghosts of the previous and next frames so you can match neighbouring poses. Enable it from Settings, where you set the previous and next frame counts, the opacity, and the tint colors.
Building an animation with AI
Section titled “Building an animation with AI”The AI Assistant can build a whole timeline in one pass: it sizes the timeline, paints the scenery on the first frame, carries each static layer across the rest, and animates the moving parts. That suits ambient motion — rain, drifting water, a flickering light — better than hand-drawing the same background twelve times. See Generate a multi-frame animation with AI.
Variations and animation
Section titled “Variations and animation”Variations can carry a different palette and a different layer-visibility preset, so one project can export a walk tag in a base palette and the same walk in an alternate palette. The Export formats & engine handoff page covers exporting all variations.