
Slice animations with tags
One pixel art project often has to export several animations: a character needs idle, walk, and attack; a UI button needs normal, hover, pressed. Animation Tags are how one timeline becomes several exportable animations, without splitting the project into separate files.
The result is a single project whose frames are divided into named tags, exportable one tag at a time.
Prerequisites
Section titled “Prerequisites”You need a project with at least a few frames already drawn. If you don’t have one, the walk cycle guide builds a 6-frame animation you can tag.
1. Open the Animation Tags panel
Section titled “1. Open the Animation Tags panel”Click Animation Tags in the top toolbar. The panel opens, empty if the project has no tags yet.
2. Create the first tag
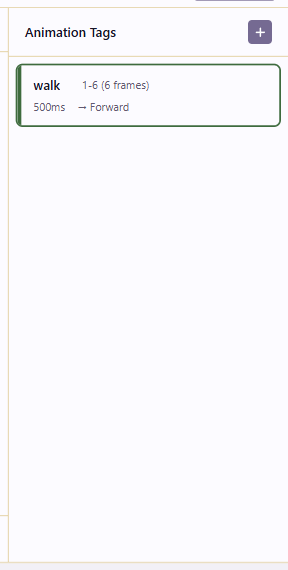
Section titled “2. Create the first tag”Add a tag and name it after the animation it covers, for example walk. Set its start and end frame to cover the frames that belong to it (frames 1–6 for a 6-frame walk cycle). When you set the range, the panel shows the total duration that range adds up to, based on the per-frame durations.
You’ll see the tag appear with a color swatch, its range, its duration, and a direction. The color is just for visual grouping in the panel; it doesn’t affect export.
3. Choose a direction
Section titled “3. Choose a direction”Each tag has a playback direction. Forward plays the range start-to-end and loops. Reverse plays it end-to-start, useful when you’ve drawn a “raise sword” animation and want a “lower sword” without redrawing. Ping-Pong plays forward then backward, which suits animations that should ease in and out (a hover state, a breathing idle).
4. Add the rest of the tags
Section titled “4. Add the rest of the tags”Repeat for each animation the project needs. A character project might end up with idle (1–6), walk (7–12), attack (13–18), hurt (19–20). The tags don’t change the frames; they just slice the timeline into named export targets.
5. Export one tag
Section titled “5. Export one tag”Open Export. Under Animation, you’ll now see a dropdown that lists All frames (N frames) plus each tag by name with its frame range. Pick a single tag, say walk (frames 7-12), and the export will only contain those frames.
Tags allow one project to export every animation a character needs, tag by tag, without duplicating frames across files. The export options themselves are explained on the Export formats & engine handoff page.
When tags are not the answer
Section titled “When tags are not the answer”Tags work when animations share a timeline and a frame size. If two animations need different canvas sizes, or completely different layer stacks, they belong in separate projects rather than one tagged timeline. A 36-frame boss with a 128×128 intro and 64×64 combat frames is cleaner as two projects.
Once your tags are in place, the next step is usually either exporting them or wiring them into a bigger project. Production workflows at scale shows how tags fit a multi-animation build.